
Overview
In this post I will be Using Vagrant (on Windows) to launch an AWS instance.
While Vagrant ships out of the box with support for VirtualBox, Hyper-V, and Docker, Vagrant has the ability to manage other types of machines as well. This is done by using other providers with Vagrant.
The Vagrant AWS Provider can be used to Boot instances in AWS.
You’ll need 2 things installed:
- Vagrant VMs initially have nothing installed on them. You need to install and configure them as if they were new computer. This is known as provisioning. Vagrant combines the powers of a provisioner and VirtualBox to configure VMs for you. (alternatives for provisioning are Ansible, Chef, Puppet)
- PuTTY and PuTTYGen ssh client (to login to Linux VM and generator of security keys) All of these install like any other windows program.
You’ll need to create and setup an AWS Account:
Ensure you have an AWS Account
You an register for an AWS Account, choose the Basic Plan (“Free”). You will need to supply your credit card details :-( even though its a free option.
Setup an access key in AWS
Go to the IAM console, and add a new user.
- Ensure this user has Programmatic Access
- and add it to a new group you call admin with AdministratorAccess. (The AWS wizard will step you through the above)
You’ll then be provided with the Access Key ID and the Secret Access Key. You need to keep these somewhere safe, they wont be provided again in the AWS screens.
Create a new Key Pair
First create SSH keys using PuTTYgen
To do this Digital Ocean has detailed instructions on how to do this at How to Create SSH Keys with PuTTY on Windows).
Basically you need to:
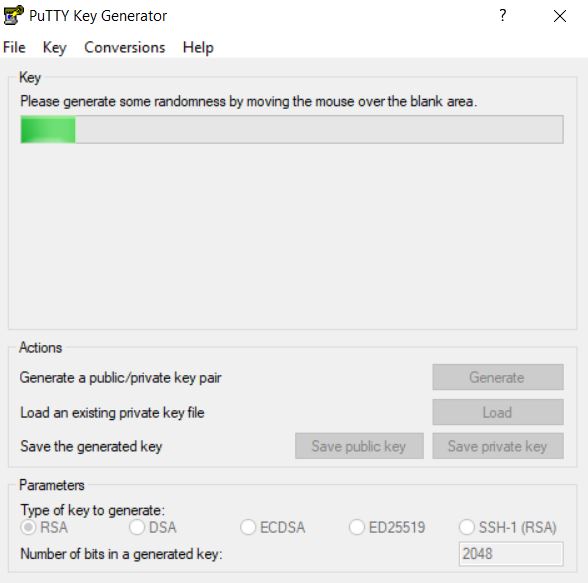
- Open PuTTYgen
- Click the Generate Button
- Move the mouse over the blank area of PuTTYgen
- When the key is generated it will display in text box for you
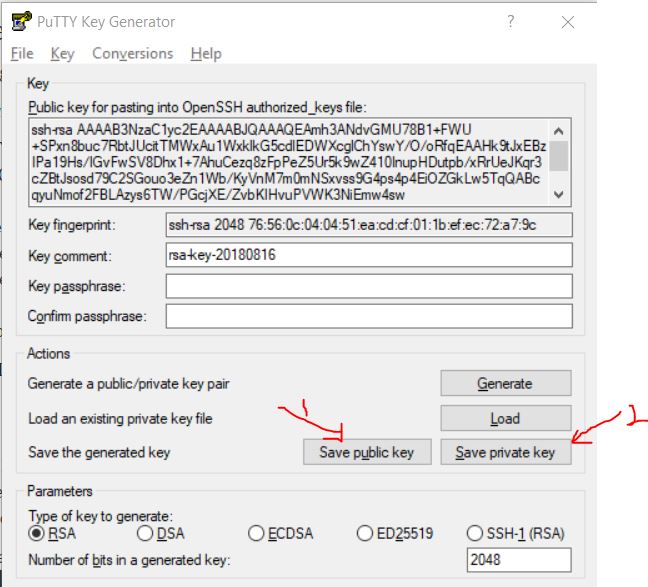
- Click ‘Save Public Key’ to save public key
- Click ‘Save Private Key’ to save private key (you will get a .ppk file (which apparently is a putty-specific format))
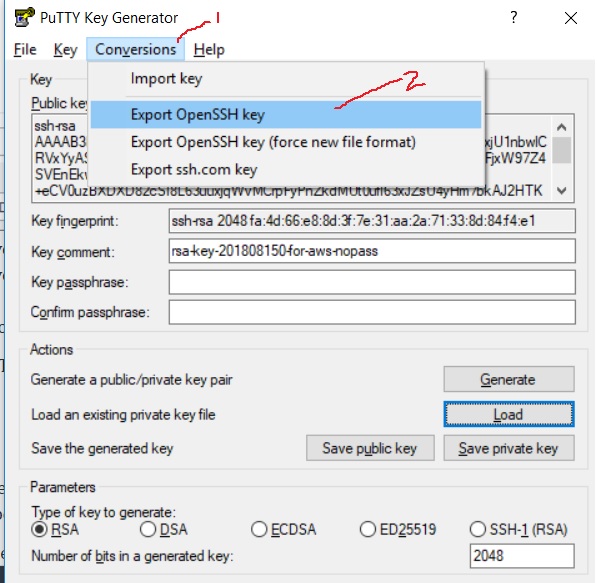
- From the .ppk file you need to “Extract the private key using puttygen” by – using PuTTYgen to load the ppk, then go to Conversion -> Export OpenSSH key. And save file with extension for this file is .pem.
NOTE: DON’T include a passphrase as Vagrant-aws currently fails if the private_key file has a passphrase.
 |
 |
 |
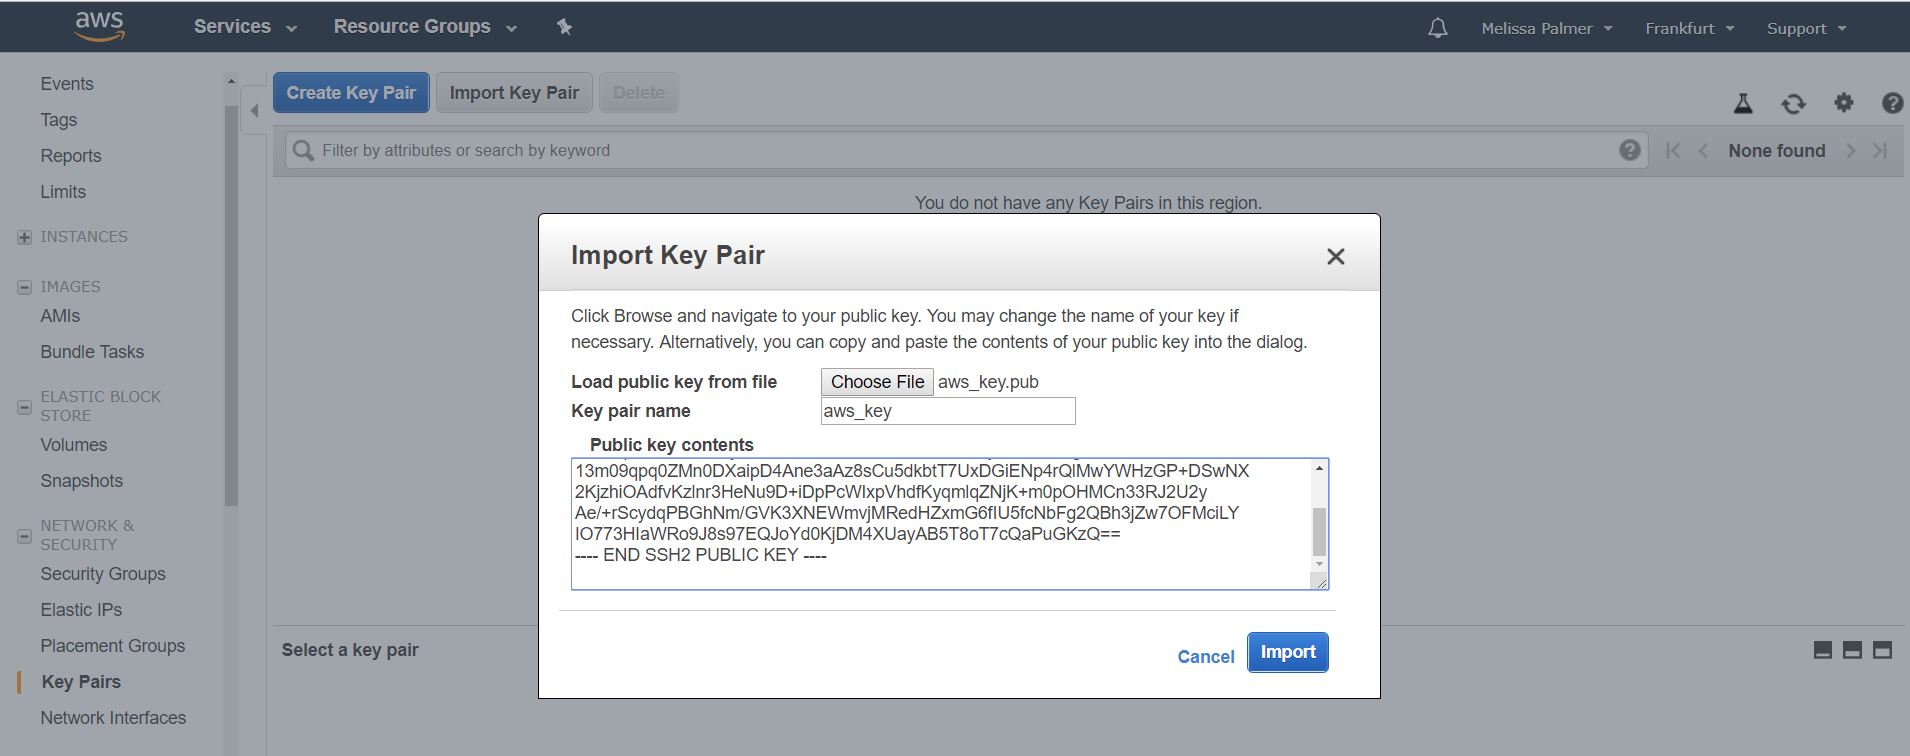
In AWS
- Go to the EC2 console
- Under menu on the right : NETWORKING & SECURITY -> Key Pairs
- Click Import Key and upload the public key created above
The image below shows doing this
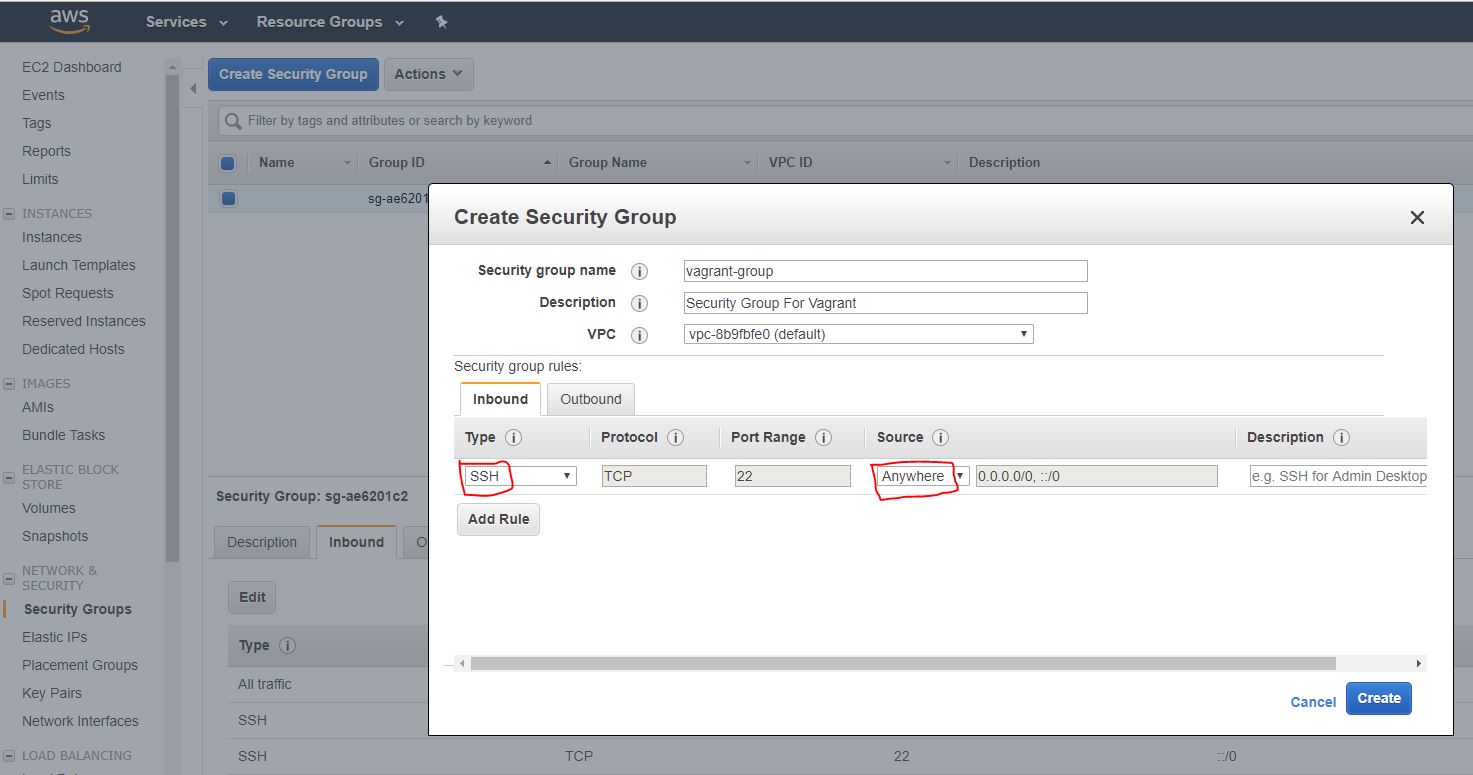
Setup a Security Group in AWS
You will need to allow an SSH connection to the new instance that gets created.
- Go to the EC2 console
- Under menu on the right : NETWORKING & SECURITY -> -> Security Groups
- Create a new group, and add a Rule for SHH as in the image below
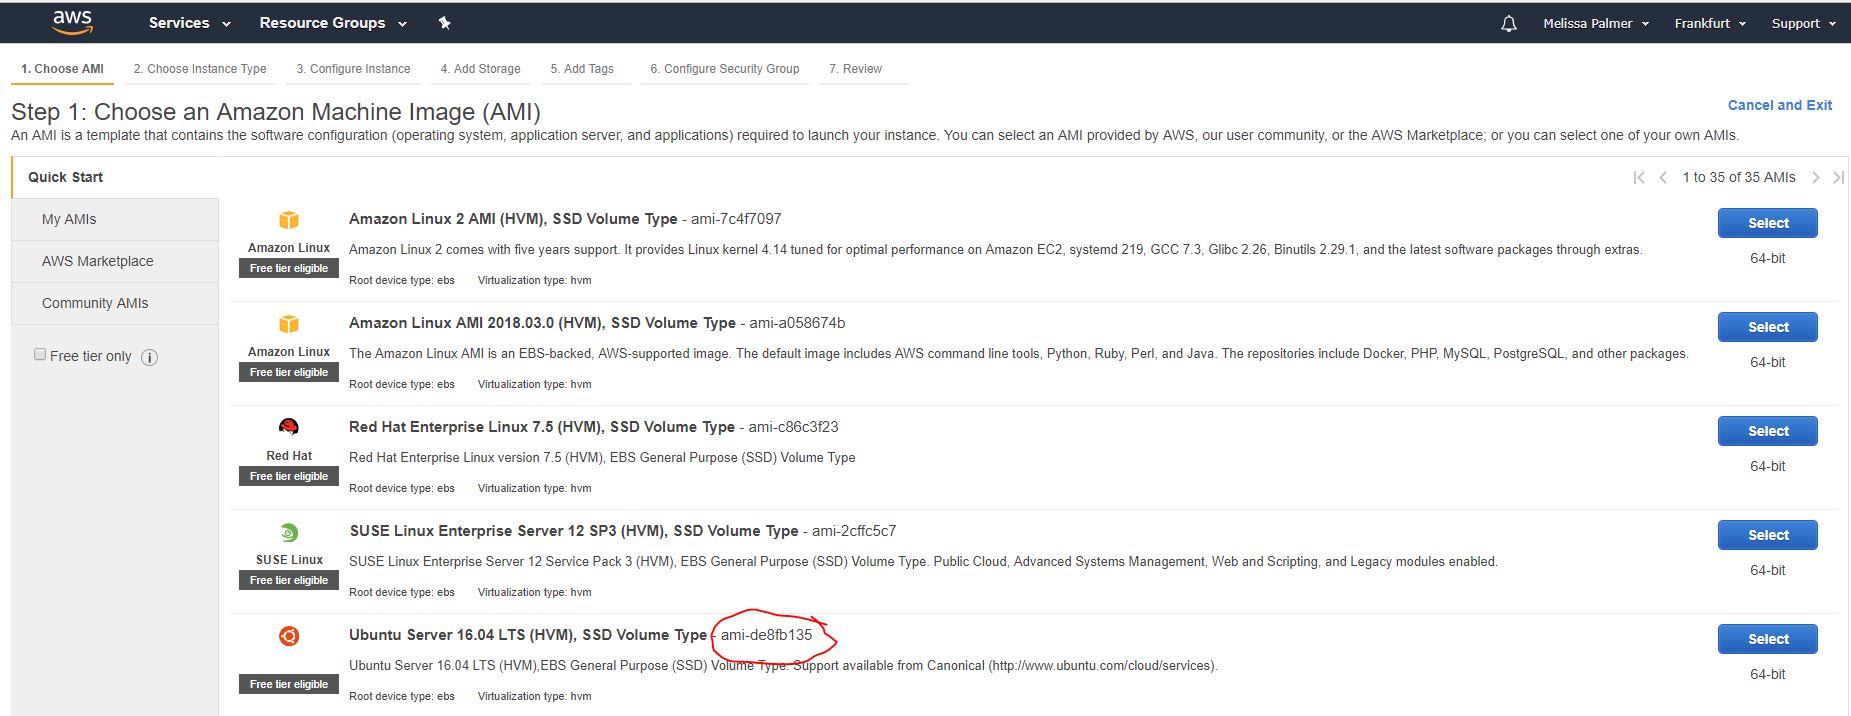
Choose an Image (to use as the base of machine/instance you spinning up)
You will see later in this post, that in the Vagrantfile you specify a ami (Amazon Machine Image).
An AMI is a template that contains the software configuration (operating system, application server, and applications) required to launch your instance.
- The IDs are region-specific, so you need to find one in the region you are using. The easiest way I found to find one is to start Launching an Instance via the AWS UI.
- Go to EC2 console and click the Launch instance button.
Prepare Vagrant
Install the AWS provider plugin
Vagrant does not include AWS as a built in provider, you need to manually install this provider as a plugin.
I had a couple of issues on Windows 10, with the standard vagrant-aws plugin. BUG that libxml2 is not found not found on Windows 10 for the vagrant-aws plugin, therefore have to run 2 commands (Windows 10, Vagrant Installed Version: 2.1.1) https://github.com/mitchellh/vagrant-aws/issues/539 comment from “rurku commented on Jun 18”
vagrant plugin install --plugin-version 1.0.1 fog-ovirt
vagrant plugin install vagrant-aws
To check if the plugins are installed correctly you can run
vagrant plugin list
You should see 2 plugins
fog-ovirt (1.0.1)
  - Version Constraint: 1.0.1
vagrant-aws (0.7.2)
Add the dummy box using any name
Even through we using AWS which uses Amazon Machine Images (as mentioned above), the definition of a Vagrant box is mandatory in the Vagrantfile. The author of the vagrant-aws plugin created a dummy-box, that can used for this. To add this box to Vagrant use:
Download the box from: https://github.com/mitchellh/vagrant-aws/blob/master/dummy.box to your own PC. Then run (in folder where dummy.box was saved):
vagrant box add aws/dummy dummy.box
Run
vagrant box list
to verify the box has been added
Setup environment variables for AWS_ACCESS_KEY & AWS_SECRET_KEY
You don’t want to include the AWS_ACCESS_KEY & AWS_SECRET_KEY in any files you commit to GIT. I created a batch file (setenv.bat) with the following lines (that I don’t add to GIT)
set AWS_ACCESS_KEY=YOUR_OWN_ACCESS_KEY_FOR_VAGRANT_USER_CREATED_ABOVE
set AWS_SECRET_KEY=YOUR_OWN_AWS_SECRET_KEY_VAGRANT_USER_CREATED_ABOVE
Setup your Vagrantfile
VAGRANTFILE_API_VERSION = "2"

# Require the AWS provider plugin
require 'vagrant-aws'

# Create and configure the AWS instance(s)
Vagrant.configure(VAGRANTFILE_API_VERSION) do |config|

  # Use dummy AWS box
  config.vm.box = 'aws/dummy'

  config.ssh.username = "ubuntu"

  # Being asked for details for SMB details
  config.vm.synced_folder ".", "/vagrant", disabled: true

  # Specify configuration of AWS provider
  config.vm.provider 'aws' do |aws, override|
    aws.access_key_id = ENV['AWS_ACCESS_KEY']
    aws.secret_access_key = ENV['AWS_SECRET_KEY']

    # Specify SSH keypair to use
    aws.keypair_name = 'aws_key_nopass'

     # Specify region, AMI ID, and security group(s)
    aws.region = "eu-central-1"
    aws.ami = "ami-de8fb135"
    aws.instance_type = "t2.micro"
    aws.security_groups = ['vagrant-group']

    # Specify username and private key path
    override.ssh.username = 'ubuntu'
    override.ssh.private_key_path = 'ssh/aws_key_nopass.pem'

  end # config.vm.provider 'aws'
end # Vagrant.configure
Explanation of Vagrantfile
- config.vm.box = ‘aws/dummy’ is the name of the box you added when running vagrant box add for AWS dummy box above
- config.vm.synced_folder “.”, “/vagrant”, disabled: true I kept Being asked for details for SMB credentials. To correct that this line was added.
- aws.access_key_id = ENV[‘AWS_ACCESS_KEY’] and aws.secret_access_key = ENV[‘AWS_SECRET_KEY’] is using the environment variables you setup in the setenv.bat
- aws.keypair_name = ‘aws_key_nopass’ name of the keypair_name needs to match the name of KeyPair you setup in AWS itself
- aws.region = “eu-central-1” and aws.ami = “ami-de8fb135” need to match the region you using for your AWS account, and AMI name you found in earlier step above
- aws.security_groups = [‘vagrant-group’] is the name of the security group created in AWS with SSH port opened
- override.ssh.private_key_path = ‘ssh/aws_key_nopass.pem’ is the location of your private key on your local windows PC. Put this in a folder ssh at same level as your Vagrant file
Launching the Instance in AWS
To launch the instance, use
vagrant up
in the console you will see output such as
C:\vagrant-aws>vagrant up
Bringing machine 'default' up with 'aws' provider...
==> default: Warning! The AWS provider doesn't support any of the Vagrant
==> default: high-level network configurations (`config.vm.network`). They
==> default: will be silently ignored.
==> default: Launching an instance with the following settings...
==> default:  -- Type: t2.micro
==> default:  -- AMI: ami-de8fb135
==> default:  -- Region: eu-central-1
==> default:  -- Keypair: aws_key_nopass
==> default:  -- Security Groups: ["vagrant-group"]
==> default:  -- Block Device Mapping: []
==> default:  -- Terminate On Shutdown: false
==> default:  -- Monitoring: false
==> default:  -- EBS optimized: false
==> default:  -- Source Destination check:
==> default:  -- Assigning a public IP address in a VPC: false
==> default:  -- VPC tenancy specification: default
==> default: Waiting for instance to become "ready"...
==> default: Waiting for SSH to become available...
==> default: Machine is booted and ready for use!

C:\vagrant-aws>
You should now be able to see you instance in the AWS EC2 console
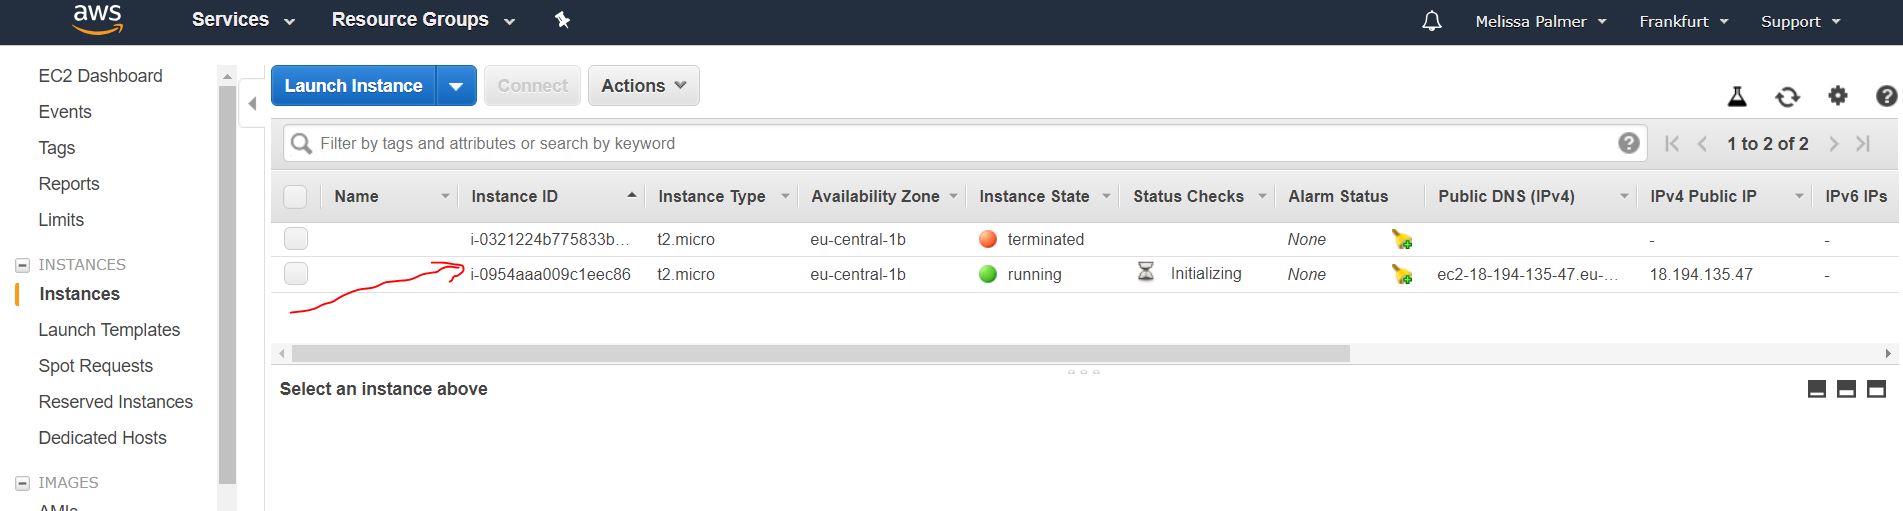
Click on your instance in AWS to see the public DNS and IP address.
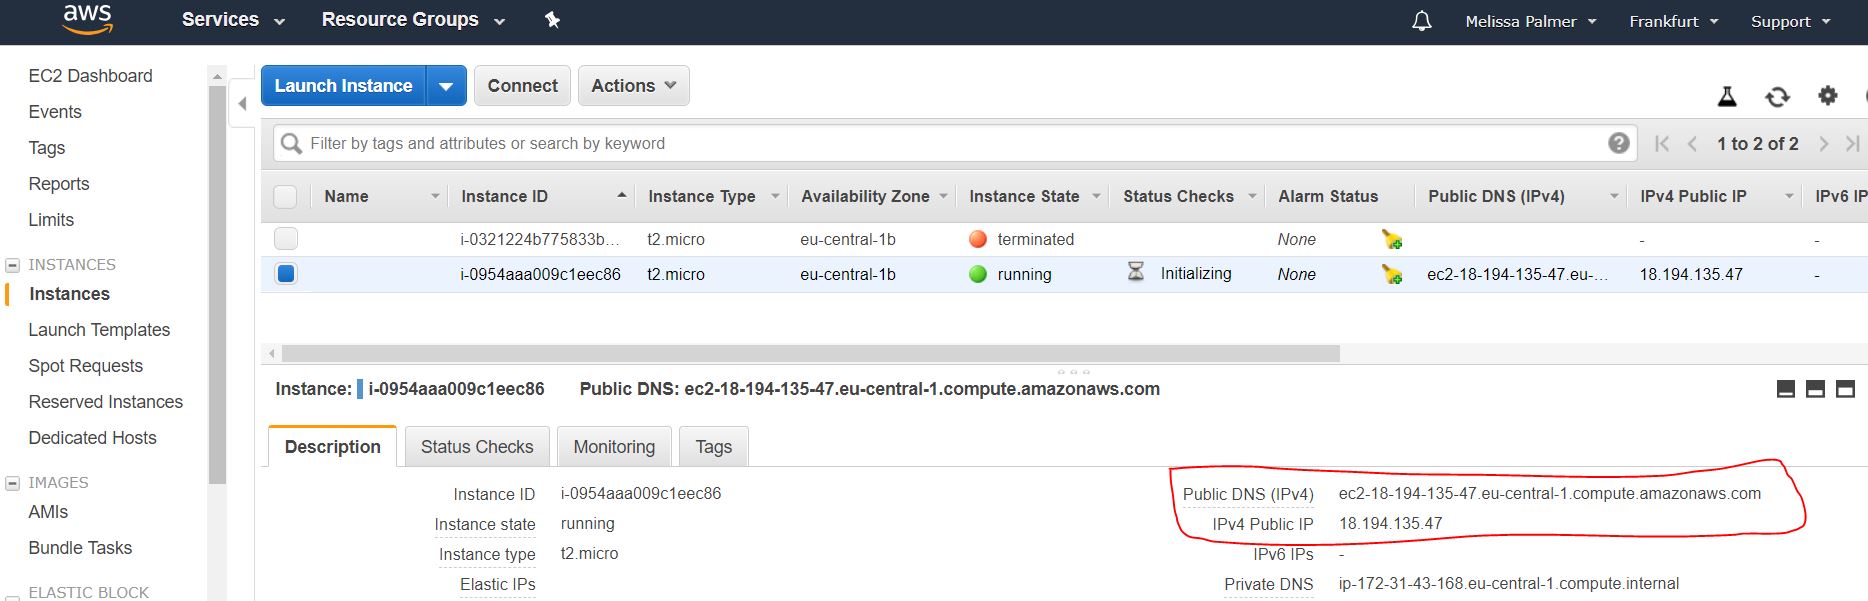
You can login to the instance using vagrant ssh or Putty
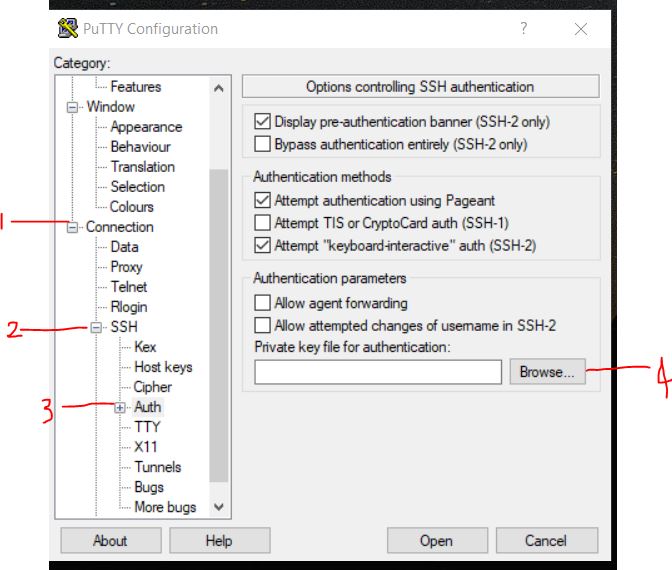
Login your instance using Putty
- Open Putty and use the above public DNS as your host name
- Then go to Connection -> SSH -> Auth
- and browser to your private key you created above
- click Open
- Putty will open a terminal to your AWS Instance that you can now work against
NOTE: Don’t forget to run vagrant halt and vagrant destroy once you’re done (if you are only using it for testing)! Else you will be charged and/or use up your free credits.
You can see the code for this post on GIT
References
- https://www.vagrantup.com/docs/providers/
- https://www.vagrantup.com/intro/getting-started/providers.html
- https://www.digitalocean.com/docs/droplets/how-to/add-ssh-keys/create-with-putty/
- https://dev.vividbreeze.com/installing-jenkins-in-aws-using-vagrant-and-ansible/
- https://github.com/mitchellh/vagrant-aws
- https://github.com/mitchellh/vagrant-aws/wiki/Common-Pitfalls
- https://github.com/mitchellh/vagrant-aws/issues/539
- https://rbgeek.wordpress.com/2015/02/19/provision-configure-ec2-instance-with-vagrant-and-ansible/